Uncover the secret to flawless furniture painting–you're probably missing this crucial step!
- Replies 0
Transforming a tired piece of furniture into a stunning centrepiece can be incredibly satisfying, especially when you're looking to refresh your home decor without breaking the bank.
Whether it's a cherished heirloom or a thrift store find, a fresh coat of paint can work wonders. But before you dip your brush into that vibrant can of color, there's a crucial step you might be overlooking that can make all the difference between a DIY disaster and a masterpiece.
Here at The GrayVine, we understand the value of doing things right the first time. That's why we're diving deep into the art of furniture painting, guided by the wisdom of Bunnings DIY expert Mitch McLean, to ensure you get the best results that will stand the test of time.
- Sandpaper (various grits)
- A high-quality primer
- Paintbrushes and/or rollers
- Your choice of paint
- Protective gear (gloves, mask, eyewear)
The most important detail, however, is understanding the material you're working with. Whether it's wood, metal, plastic, or MDF (medium-density fiberboard), each requires a specific approach to ensure the paint adheres properly and lasts.

Also read: This appliance is dirtier than your toilet! Can you guess which one it is?
Also read: Transform your bathroom like a pro with these insider deep cleaning shower secrets
By following these expert tips, you'll be well on your way to reviving your furniture with a professional-looking paint job. Remember, the devil is in the details, and that one detail–preparation–is what sets a successful furniture painting project apart from the rest.
Read next: Does your car smell musty? This overlooked part could be the surprising cause!

We'd love to hear about your furniture painting adventures! Have you recently given a piece of furniture a new lease on life? Share your stories and tips in the comments below, and let's inspire each other with our creative endeavors.
Whether it's a cherished heirloom or a thrift store find, a fresh coat of paint can work wonders. But before you dip your brush into that vibrant can of color, there's a crucial step you might be overlooking that can make all the difference between a DIY disaster and a masterpiece.
Here at The GrayVine, we understand the value of doing things right the first time. That's why we're diving deep into the art of furniture painting, guided by the wisdom of Bunnings DIY expert Mitch McLean, to ensure you get the best results that will stand the test of time.
The Essential Supplies You'll Need
Before you start, make sure you have all the necessary supplies on hand. You'll need:- Sandpaper (various grits)
- A high-quality primer
- Paintbrushes and/or rollers
- Your choice of paint
- Protective gear (gloves, mask, eyewear)
Preparation: The Key to Perfection
The secret to a flawless finish lies in the preparation. Choose a well-ventilated area to work in, as this will not only protect you from inhaling harmful fumes but also ensure the paint dries correctly. Allocate enough time for the project, considering the need for multiple coats and drying time between each.The most important detail, however, is understanding the material you're working with. Whether it's wood, metal, plastic, or MDF (medium-density fiberboard), each requires a specific approach to ensure the paint adheres properly and lasts.

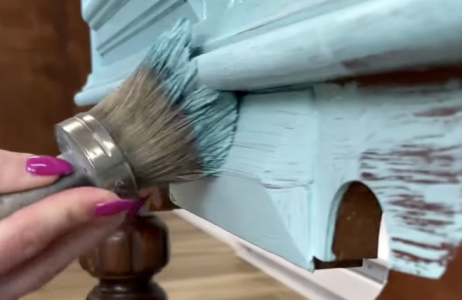
Properly prepping furniture ensures the best paint results and durability. Image source: @KachaFurniture / YouTube
Metal Furniture: A Step-by-Step Guide
For metal furniture, start by thoroughly cleaning the surface. Lightly sand the metal to create a rough surface for the primer to adhere to. Use a metal primer, such as Dulux Duramax Flat Metal Primer, to prevent rust. When it comes to painting, oil-based or acrylic paints are your best bet for a chip-resistant, rust-preventing finish.Also read: This appliance is dirtier than your toilet! Can you guess which one it is?
Plastic Furniture: Achieving a Smooth Finish
Plastic furniture will also need a good clean and light sanding with a fine-grit sandpaper. A plastic primer designed for smooth surfaces is essential here. For the paint, choose a spray paint specifically formulated for plastic to get that smooth, durable finish.MDF Furniture: Budget-Friendly and DIY-Friendly
MDF is a common material for budget-friendly furniture and is quite popular among DIY enthusiasts. After a light sanding to smooth any rough spots and a thorough dusting, apply a primer to seal the surface and prevent uneven paint absorption. Water-based latex or acrylic paints are recommended for their ease of application and quick drying times.Solid Wood: Timeless and Classic
Solid wood requires a thorough sanding to remove old finishes and imperfections. Dust off the surface, then apply a wood primer for even coverage. Depending on the desired finish and durability, you can opt for either oil-based paint for a durable, smooth finish or water-based latex paint for easier cleanup and faster drying times.Also read: Transform your bathroom like a pro with these insider deep cleaning shower secrets
Painting Your Furniture: Patience Pays Off
With your preparation complete, it's time to paint. Remember, multiple thin coats are preferable to one thick coat to avoid drips and achieve a smooth finish. Follow the paint's instructions for drying times, which typically range from four to six hours between coats. Proper ventilation can help speed up the drying process.Post-Painting Care: Protect Your Effort
To protect your newly painted furniture, consider using a sealant like Selleys Paintable Sealant for a waterproof seal and faster drying time. Regularly clean the furniture with a soft cloth and avoid harsh chemicals. Keep the furniture out of direct sunlight to prevent fading, and hold onto some leftover paint for future touch-ups.By following these expert tips, you'll be well on your way to reviving your furniture with a professional-looking paint job. Remember, the devil is in the details, and that one detail–preparation–is what sets a successful furniture painting project apart from the rest.
Read next: Does your car smell musty? This overlooked part could be the surprising cause!
Key Takeaways
- Preparing the surface of the furniture correctly is crucial for achieving the best painting results and longevity.
- Different materials such as metal, plastic, MDF, and solid wood require specific types of preparation and paint to ensure a quality finish.
- For a smooth, drip-free finish, it is recommended that multiple thin coats of paint be applied and that sufficient drying time be allowed between coats.
- To maintain the newly painted furniture, regular cleaning with a soft cloth, avoiding harsh chemicals, protecting from sunlight, and possibly sealing with a paintable sealant are advised, along with keeping leftover paint for future touch-ups.


